CMS Settings
Like any complex application, the Xibo CMS comes with a number of configurable options.
These are found by navigating to Settings under the Administration section of the main CMS menu:
Xibo Cloud hosted customers will have some of the Settings fields pre-populated, some can be changed with others locked to disable editing. For further information please see Xibo Cloud CMS Defaults and Restrictions.
For ease of use settings have been split into related Categories:
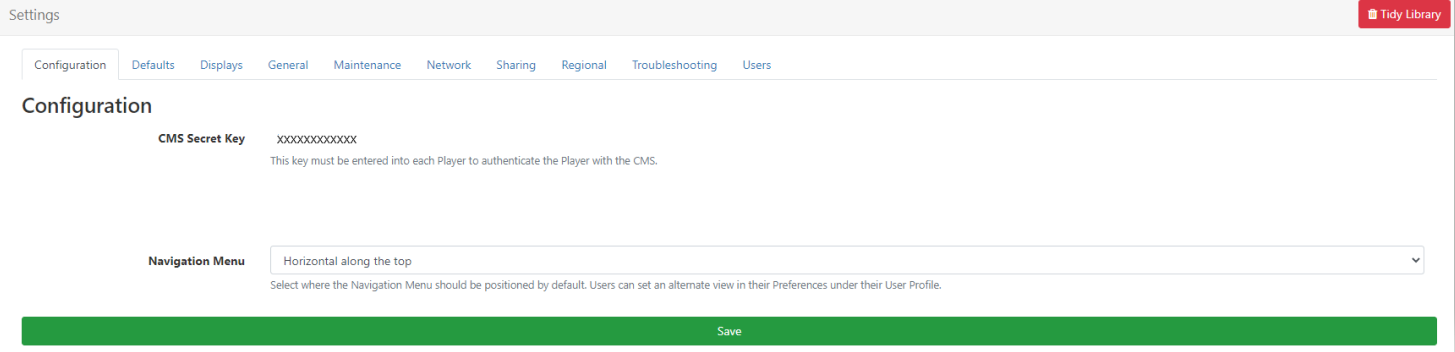
Configuration
- View the CMS Secret Key which is used to authenticate Players with the CMS.
- Select the default positioning for users of the CMS for the Navigation Menu.
Defaults
- Set default behaviours for Media files.
- Enable Layouts to be Automatically Published after edits are made.
- Set Default Transitions to apply to Widgets.
- Enter Resize Thresholds and Limits for images.
- Set the Default ttl in days for records in the purge_list table to be removed.
- Set default values for items that can be assigned to dynamic Playlists.
Displays
-
Assign a Default Layout to show on Displays.
-
Set defaults for Latitude and Longitude for Geo aware Previews.
-
Add a link to the Display name using the last IP address collected.
-
Set the default settings to use with the collection of Proof of Play statistics.
-
Define the default size and retention period for Display Screenshots.
General
-
View the address for the user manual.
-
Tick to Allow usage tracking to send anonymous statistics to help to improve the software.
-
Enable Send Schedule in advance and set the time in seconds.
-
Tick to Enable Library Tidy functions.
-
Enable settings to show the Latest News and to show a Logo when exporting a saved report to a PDF.
Maintenance
- Enable Maintenance and set email alerts.
- Set maximum retention ages for Logs and Statistics.
- Set the minutes for the Max Display Timeout and enable to send repeat Display Timeouts.
Network
- Set Email settings, which need to be completed prior to setting up any email notifications.
- Provide network settings such as Proxy Server information (if your CMS is behind a proxy)
- Set monthly Bandwidth and Library size limits.
- Enable to force HTTPS.
- Enable STS to response headers and set a Time out (ensure that you fully understand STS before enabling this option as it will prevent access via HTTP after the first successful HTTPS connection.)
- If the CMS is behind a load balancer, enter a comma delimited list of the load balancer IP addresses to Whitelist.
Sharing
- Use the dropdown to select how to colour Widgets shown in the Playlist editor.
- Enable to allow Users with View Share options applied to Displays are also allowed to schedule to them.
- Enable to show Layouts for existing Scheduled Events even when the user does not have View Share options applied.
- Tick to allow for modifications to the Transition configuration.
- Tick to allow Users to save content to the top level Root Folder.
Disable this option to force Users to first select a Folder to save in!
Regional
- Set the Language to use for the CMS.
- Let the CMS know what Timezone it should use by selecting the nearest major city in your timezone.
- Set the Date Format default to use for displaying date data in the CMS.
- Tick to detect the browser language to use for the CMS.
- Use the drop down to select which type of Calendar the CMS should use.
Troubleshooting
- Set the Resting Log Level which the CMS will revert to after an elevated period ends.
- Set the Log Level the CMS should record.
- Provide an until date to Elevate the Log.
- Set the Server Mode to display the maximum allowed error messaging through the UI.
Useful for capturing critical php errors and environment issues.
Users
- View and set one of the existing Super Administrators as a default System User for the CMS. (why do you set this?)
- Set the Default User Group to assign when onboarding new Users.
- Set the Default User Type for when creating new Users.
We recommend that this is set to User!
-
Set a Regular Expression for Password Complexity. A text description will be shown to users who enter a password that does not meet the requirements entered.
-
Select to enable a Password Reminder on the CMS login page.
Ensure that a valid Sending email address has been entered on the Network tab before enabling this.
- Enter the name that should appear as the Issuer to be used when Two Factor authentication has been enabled.
Tidy Library
The Tidy Library button shown on the settings page is available for Super Administrators only and inititates a system wide Library tidy operation to clear up orphaned Media items and temporary files. More information can be found in our User Manual: Tidy from Settings
By default this function is set to Off for Xibo in the Cloud. Set to On if you wish to enable.