Upgrade and Switch to Docker Install
- Xibo for Android
- DSDevices DSCS9X/95 Set-up Guide
- Install a White Label or a different Player version on DSDevices
- CEC Screen Power on/off with DSDevices
- Hardware Recommendations
- Philips Signage SoC Monitors
- Sony Bravia SoC
- Managing Storage on the Android Device
- Player Settings
- Players without an Internet Connection
- Remote Administration with SS Helper
- Restart Rooted Device with a Shell Command
- Running Xibo for Android
- Resolving Common Issues
- Error shown when I try to licence my Player?
- Player not updating from the CMS?
- I can see my Licence entry but the Player appears unlicensed?
- Error message - Player is missing dependencies
- My scheduled Layouts are not working?
- Layout won't play? Splash screen plays?
- Watchdog error message
- Troubleshooting for Administrators
- Audit Trail
- Log Information
- Player Logs
- Getting the Player Status
- Request Player Status via CMS - Logged in Players only
- Request Player Status directly from a Device
- Can I use the Xibo name / logo?
- Can I run a Xibo Player on Raspberry Pi?
- How can I increase the upload file size limit?
- How do Players communicate with the CMS?
- How many displays can Xibo support?
- How do I reset the Xibo_admin account password?
- Power On/Off for Players
- Testing with Xibo
- Why do I need a Default Layout?
- Xibo for Android FAQ's
- Autoplaying Embedded Youtube Videos
- Closing to Home screen
- Displaying Images
- Embedded TV
- External SD card not listed when running Banana-Pi
- Helper Command to change Time zone
- HTML5 Video
- Memory Notifications
- Menu not accessible
- SSL Support
- Using Portrait Displays
- Video wont play properly
On this page
Upgrade and Switch to Xibo for Docker Install
Switching to Docker

Follow the CMS Installation Guide for your choice of platform, until you get to the step where the CMS is initially bootstrapped. Do not run the docker-compose up command. When you get to that step, please return here, and pickup.
If your server is already running a web server, then you will need to pay specific attention to the instructions on running on custom port numbers.
Once you have Docker installed, and have extracted the Xibo Docker Release Archive, and created your config.env file, you should continue from this point.
In the same directory as you extracted the docker-compose.yml file, create the following directory structure;
shared
     |
     - backup
     - cms
         |
         - library
Copy the library files from your existing install in to shared/cms/library - so for example, you might have shared/cms/library/10.jpg.
On your existing Xibo installation, empty your log table by using the CMS Web Portal to go to the Log page and clicking on Truncate, or by running TRUNCATE log from a MySQL prompt with your Xibo database selected.
Export your database from your old installation by running the following, e.g. mysqldump -u user -p database-name > shared/backup/import.sqlwhere user is the Xibo database user.
You will be prompted for the password. You can find both those values in the settings.php file in your old Xibo installation directory.
If you’re not comfortable using the mysqldump command, then see the following section Exporting with PHPMyAdmin which covers using PHPMyAdmin if you have that available, however, please note that PHPMyAdmin is known to have issues exporting very large database backups reliably.
It is CRITICAL that your import.sql file contains only the Xibo database that you wish to upgrade. It must not contain multiple databases. Specifically, it must not contain a USE db_name command.
Save your database export as shared/backup/import.sql
We can now bring up the new CMS containers with your old data.
Run the following;
docker-compose up -d
or if you’re using a ‘custom ports’ or remote mysql docker-compose file,
docker-compose -f custom.yml up -d
where custom.yml is that custom file you’ve created.
That will cause the containers to be created for your database, web server and XMR server.
After a period of time (allow up to 10 minutes), you should see the CMS webpage appear at http://localhost or http://localhost:port if you’re running on a custom port.
Since we’re importing a non-Docker based installation, there’s a couple of additional steps to take which require direct modification of the database. If you’re running with an external database, then please run the SQL commands listed below directly on your remote database instead of running these commands from inside the Docker console.
First, run docker ps to list all running docker containers, and find there the name of the database container. It will be the one with web in the name - so for example Xibo_cms-web_1.
Once you have the database container name, run the following to get to a shell inside the web container;
docker exec -ti Xibo_cms-web_1 bash
Next, run the following;
mysql -h mysql -u cms -p cms
You will be prompted for a password. It will be the one that you chose in config.env for MySQL.
Assuming the correct password is entered, you’ll be presented with a MySQL command prompt.
Run the following commands;
UPDATE `setting` SET `value`="/var/www/cms/library/", userSee=0, userChange=0 WHERE `setting`="LIBRARY_LOCATION";
UPDATE `setting` SET `value`="tcp://cms-xmr:50001", userSee=0, userChange=0 WHERE `setting`="XMR_ADDRESS";
UPDATE `setting` SET `value`="Apache" WHERE `setting`="SENDFILE_MODE";
exit
Run exit again to return to your local machine shell.
Finally, delete any files inside shared/cms/library/cache directory (you may need to use sudo or be the root user on a Linux system to do so).
You should then be able to log on to the upgraded web interface using an administrative user account. The password will be the same as your old installation used.
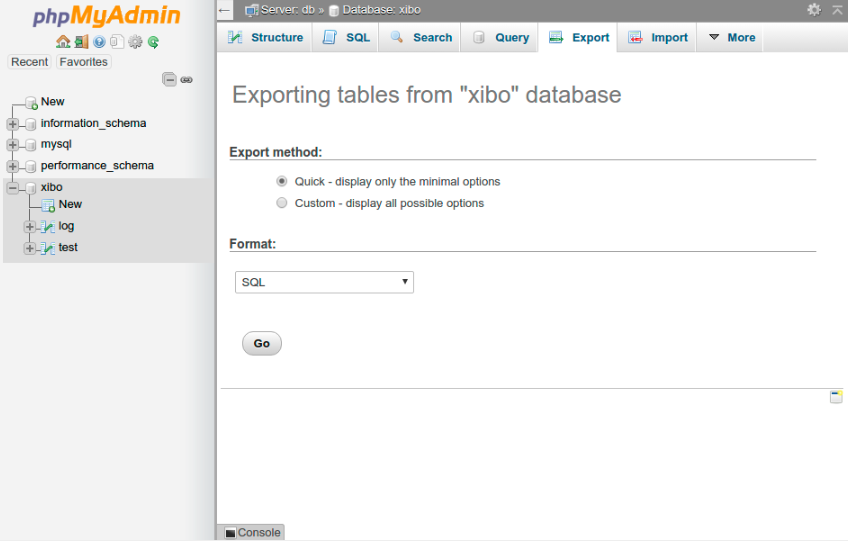
Exporting with PHPMyAdmin
The example above uses mysqldump , however, if your environment does not have mysqldump it is possible to use phpmyadmin to generate a backup. Care must be taken to ensure that a database is selected in the left-hand pane before going to the export tab. Failure to do this will result in the export containing the existing database name, which may not match the new name in Docker.
Step 1:

Step 2: